Friday, 28 January 2011

Watching Documentary.

Whhilst watching this documentary I realised that Thomas Sutcliffe is trying to establish the two ways in which you can seduce your audience; either by going straight into a film or right from the beginning of the film to seduce your audience with instant arousal. In my opinion i believe as part of an audience i prefer a film to instantly catch my attention from the beginning and seduce me into the film so that i can keep watching.

The risk of starting a film with such energy and high expectations is that the expectations are hard to keep up. It has to live up to the rest of the film so there won't be any disappointment. By having an explosive first scene at the beginning the rest of the film may be a bore, however as part of the audience i think i'd be very anxious to see what will happen next, and what caused such an explosion at the beginning. At the same time you don't want th opening to give away too much, but you don't want to give too little.

Some classic film openings are long shots of a town, city or area. Buildings, receptionists, officies etc. This is effective because the mise en scene can be easily and quickly understood. Also, you have to establish your characters and introduce the important roles in the films so that the audience can get a clear understanding of the story line.

'A favourite trick of Film Noir' is a trick which has inspired many thriller films to date. The trick is, to show the end of the film at the beginning. In other words to show the outcome before how it actually happened, how it came about to occuring. This can be confusing however also very effective because it leaves the audience at the edge of their seats wanting to know more, and how the outcome came about, drawing them into the film.

The opening of the film 'Touch Of Evil' creates suspense with all the different high and low angle shots creating interest as well as tension, making you see everything from different points of veiw. The whole of the 4 minute scene is the longest ever scene known which was shot in only one take. (See below video.) This was done by tracking, which must've taken over a few weeks to master, and occured alot of plannning.




Thursday, 27 January 2011

Jellybaby prelim anamatic.


Plan:

Our jelly baby sequence was inspired by the famous shower scene in 'Psycho.' We had to follow the brief of "A character opens the door, walks into a room, sits down opposite another character and they share a few lines of dialogue." We extended this brief to link it with everything we have recently learnt e.g: intertextuality and creating suspense. Instead of using dialogue we added interesting sound effects and soundtrack using 'Soundtrack pro.' The music at the beginning makes the audience think everything is happy and going well, when the breathing comes in they soon get the sense of terror and danger which is backed up by the violin string sounds. We added a scream to emphasis the sense of thriller atmosphere. We will use this as development as next we will carry this plot out, but using real characters instead of jelly babies.


This shot was influenced by the shower head shot in Psycho. It creates tension and the premonsion of danger as the same thing happens in Psycho so the audience expects that something bad is going to happen.

This shot was also taken from the end of the shower scene in Psycho. However, we made it a long-shot to include the characters instead of just focusing on the plug hole as we thought this was more suited to the situation. In contrast to Psycho we made the killer known to the audience rather than than having the killer as just a shadow, as this was more relevant to the story.

We came across a few obstacles whilst filming this, for example: the shower scene had very limited lighting which we couldn't do much about, however we later realised we could have changed the filter in the camera to increase lighting. When we film with people next week, we will continue the theme of Psycho and pay more attention to the lighting and dialogue.


 Here is the 180 degree rule we had to follow in order for everything to look professional and fluid.

Wednesday, 26 January 2011

Soundtrack Pro- Introduction.


First I chose an orchestral string which draws the audience attention, then i put atmospheric beat which created the specific atmosphere. Then i put natural sound of air and hammer. Texture and abidance are next. Over the orchestral and atmospheric sound, there is also an acoustic double bass. I have arranged each of them to come one after another to create a feeling of suspense and raising emotion. 
On the right hand site there is a window where we can put the movie. It allows to watch and choose the soundtrack at the same time. 

Screen shot of the Soundtrack Pro
On the same lesson (24.01.2011) we have been introduced to other software called Soundtrack Pro. This program allows creating a soundtrack. It provides range of much different sound. We can choose them form menu. They are divided into several groups of hundred sound from orchestral, natural sounds from home/work, nature sounds, vocal sounds, like breathing, singing and talking, drums, violins and heavy beats, mysterious, guitar. They all help to create a particular sound. We can easily preview to sound by clicking on it once. If we are happy with it, we need to drag it into the big box in the middle of our screen. Then we can change the length of it by moving it forward or backward. We can also put as many as we want soundtrack to create a better expression which will help us to emphasize the importance of an action in the movie. On my sample soundtrack I was trying to create a music which will create a thriller and mysterious feeling. We can also change the volume of particular sound which will help to create a greater effect. 

LiveType-introduction

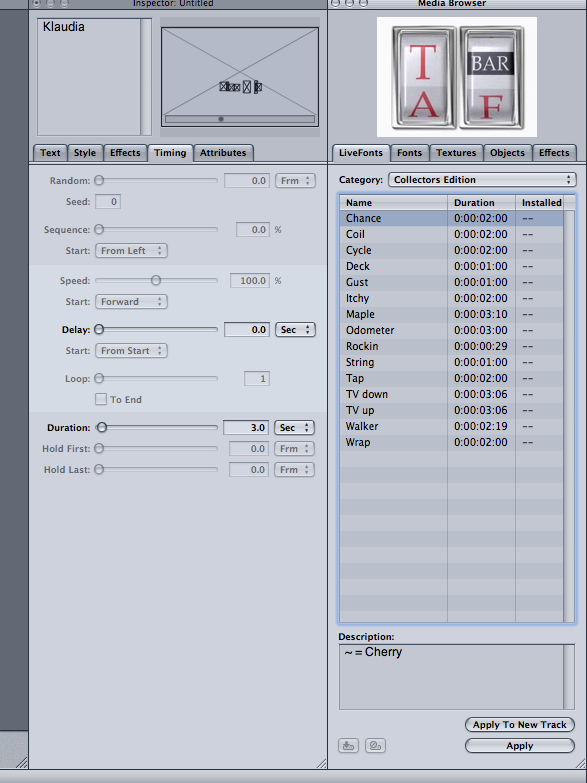
On the last lesson ( 24.01.2011) we have been introduce to the new software called LiveType. It is a program to create a title using different fonts, special effects on the range of backgrounds and colours. There is 'million' of different option to choose so it is not hard to find something which will suit people's needs.
   
Here is an example of my final work. I had put my name as a title. It takes about 3 second to fully appear on the screen. Each letter comes separately, one by one. I also chose a similar in colour background of moving letters and number, which suit each other very effectively, creating a feeling of chaos.

 There is a menu where we can choose the look of our title. The options are divided into: Livefonts, fonts, textures, objects and effects. We can also change the text, style, timing and attributes of it. There is a small window about the option to preview it. 

When we are happy with it, we need to click on 'apply to new track'. Each of the choosing appears on the line time. We can manipulate for how long each elements is on the screen by dragging forward of backward particular track.


The title needs to fit into the green box mark on the preview sceen. Everything which goes beyond it, will be not see afterwards. The blue line, responses on the place of title. When can change it by dragging it down or up. 

LiveFont -A 'LiveFont' is one of the program's key features. These are fonts with animated characters. Examples of the LiveFonts shipped with LiveType are animated handwriting, smoke writing, fire, and blinking LED characters. It is also possible to create custom LiveFonts, but the necessity of generating a separate movie file for each letter makes the file sizes very large

Effects -various animation effects can be applied to type, either LiveFonts or normal system fonts. There are, for example, glows, scrolls, fades and zooms. The timing of the effects can be customized and new effects can be created from scratch using keyframing.


Templates -apart from text, there is a wide range of animated objects and textures that can be added to a sequence, and there are a number of templates - such as title themes. Any image or movie file can also be placed and edited on the canvas.


Monday, 24 January 2011

Sound: skills.

Using 'Soundtrack pro software' i explored how to insert music and sound effects to our bag swap sequence. Over hundreds of sounds from orchestral, natural sounds from home/work, nature sounds, vocal sounds like breathing, singing and talking, drums, violins and heavy beats, all allowing you to create a dramatic or on the other hand, a soft soundtrack backing to your video.

As our bag swap started with Valeza fastly running down the stairs with the mise en scene being at college, we decided to add a school bell at the beginning, then slowly breaking out into a dark orchestral peice. The to add drama as the bag drops, we added a 'bang' sound, and then re-added the orchestral sound. As Valeza realises her bag has been swapped she looks at it, so we inserted heavy breathing noise to emphasis her fustration. The beat gets louder near to the end to increase her anxiety and worry. Below is a screen shot of my first first using the Soundtrack pro software.


The software allowed us to put many different sounds over eachother to create a confusing yet effective sound. We could drag the green bars to make the sound go on for longer, increase the volume of certain bits, and change the timing. We wanted to create a 'thriller' like atmosphere which is why we went for heavy breathing to show anxiety, high pitched string instrumental sounds to create tension and heavy beats to indicate that something dangerous will happen. When experimenting i found that the timing really matters between each different sound, as it needs to flow nicely without awkward pauses or incorrect gaps. It took a long time to go through each of the sounds making sure which would be suitable for our video, a trail and error method was carried out. The audio editing mode is where individual clips can be edited. The waveform, as well as a frequency spectrum, can be viewed for the clip. The audio can be analyzed for common audio problems such as clicks and pops, power line hum and clipped signals, and then any discovered problems can be fixed. Audio can be faded in and out, the amplitude can be altered for a selection, noise can be removed and silence, waveforms and ambient noise can be inserted. There is also a selection history tool that cycles between previous selections. After zooming in on the individual samples in the audio waveform, the pen tool can be used to edit the wave directly.

Introduction to editing: skills.

After filming our short thriller film, we edited the clips using the program 'Final cut pro' to make them into a mini-movie. We picked the clips which would cause the least continuity- they all fitted together in the end while at the beginning, some parts didn't look right e.g. the bag was on the wrong side of the door etc. we didn't use any effects such as fading because we wanted to keep it simple; so we mostly used jump-cuts from one clip to another to create the atmosphere of a fast-paced thriller.

Initially, we wanted the part where the bag drops to be in slow-motion to emphasize the importance of that particular moment i the sequence, but we ran out of time in which to do it, but i think it is still effective as it is because it might confuse the audience for a while, then understanding comes at the end. 

When we make our final thriller sequence, i will make sure i plan each shot/scene before hand to save time and minimize confusion, and i will also make sure we have enough time for editing, as i think films really come together while they are being edited.

Livetype and sound: skills.

Today in class we learned how to use the programs Livetype and Sound to create titles and the soundtrack for our practice thriller 'the bag swap'. we will use the skills we learned and these programs to eventually make the title sequence and soundtrack for our final thriller opening.

To use Livetype, you must first type in the piece of text you wish to create into a title, you can then choose what type of font, colour and size you would like the text to be. Then you choose the background of the text and any objects you would also like in the background. (there is a wide variety of options for all <<--these effects available) In our actual film however, we will not use backgrounds; just plain black or writing over the scene like title sequences in actual films. Finally, you can move the writing around on the screen if you wish and choose a transition effect (how the writing comes onto the screen e.g. the train-like transition in the opening sequence of 'The taking of pelham 123') Above is my first attempt at creating a title sequence using Livetype.

We also learned how to use a program on apple mac called Sound, which we can eventually use to create the soundtrack of our thriller opening. First, we tried making a soundtrack off the top of our heads, i made one which i thought would go well with the opening of 'Deja vu'; i used the sound of the sea with children laughing and people talking, then later comes in a sinister undertone and a scratching sound, which builds the suspense slightly. In order to practice making the soundtrack together with a clip, we worked together in our groups, using our bag swap scene as the basis for a practice soundtrack.